Sunday 31 May 2015

It's that CD again!

Regular visitors will know about the Love/Hate relationship I have with Joanna Sheen's "Viva la Divas" CD. I love the images on it - they often make me laugh out loud. And yet they just aren't very versatile - they seem to have been designed just to plonk on a card and call it a finished item. However I keep on plugging away with it, in the hope that if I use it enough, I'll learn to love it.

This is one of my very favourite images from the CD. I love the sentiment - after all, what woman has never dreamed of being a femme fatale - even if just for one day? And that necklace, earrings and gown are just crying out to have a bit of bling added, which makes it ideal for the CD Sunday challenge Add some bling or glitter.

I've gone really over the top with the bling on this, firstly sketching over various parts of the image with a glue pen and adding different colours of glitter to match the printed colours, then layering everything on holographic card, edging the whole lot with peel offs and finally adding some sparkly hearts. A real bling-fest, and a massive departure from the  clean and simple styles I'm generally moving towards these days.


Plump Pachyderm

I love this cute little elephant stamp, part of a Debbi Moore set. This time I've used him in a very CAS way, stamping and colouring him then cutting him out and adding him to a card I'd doodled a simple border and sketched some grasses on. There really isn't anything more that needs to be said!


I'm sharing it with
Less is More - two legs or four (well we can only see three legs, but he looks far too jolly to have lost a limb)
ATCAS - Animal
Crafty Creations Challenges - All creatures great and small
Crafty Gals Corner - Critters

Saturday 30 May 2015

For a special little girl

First of all....... Hello again! I've not been around very much over the last month or so, although scheduled posts and quick drop ins have kept things ticking over, but I've not had chance to return visits and comments, read other blogs and join in challenges as much as I normally like to. A visit to one of my daughters in France, a trip up North to visit my Mum and a visit here from a good friend (complete with a day of total pampering at a spa) have all kept me away from the computer and out of the kitchen and craft room for much of the last few weeks.

Anyway, now I'm ready to get my teeth back into my crafting, and I've started with a card for a Very Important Little Person, my oldest granddaughter who will be six in June. At six, fairies and sparkle are very important features in every day life (as are princesses, Minions and cycling, but I can't fir everything onto one card!) so naturally they had to feature. I also wanted to include lots of die cuts, as Lara loves using the Grand Calibur with me. At the moment she isn't strong enough to turn the handle unaided, but she loves to choose the colours and shapes and is fascinated that a plain piece of card can so easily be transformed into a butterfly or flower (I'm still fascinated by that, too, if truth be told).

The fairy toppers are circle stackers made from a  Buzzcraft Fairy Doodles die cut sheet, available from Foil Play. Mine actually came in one of their great value Lucky Dip kits which are ideal for children and beginners, but as you can see here can also be taken much further. The other materials are from my stash. The glitter card I have used for layering the toppers can be quite tricky to use, as things don't adhere well to the glittery surface, but I sanded away the glitter from the centre of the circle where it was going to be covered up, and then used the red-backed extra strong double sided tape to stick the toppers in place. A tip when using red-backed tape - that backing tape has a powerful static charge that makes it stick to your hands and refuse to be dropped into the waste container. But if you wipe your hands with one of those fabric softener sheets meant for using in tumble driers, it neutralises the charge and you won't end up covered in little bits of red plastic!


I'm sharing this with:

Cuttlebug Mania - Bling
Suzy Bee's Blooming Challenge - Make it Bright and Colourful
Addicted to Stamps and More - Anything Goes

Tuesday 26 May 2015

Checks and Plaid at Cardz 4 Guyz

This week at Cardz 4 Guyz we'd like to see masculine makes featuring gingham, checks or plaid as a prominent feature of the design.

I thought about using one of several Scotsman-in-kilt images that I have on various CDs, but I rather thought that *certain* readers <looking very hard in the direction of one or two people here> might start speculating about what they were wearing under their kilts and lower the tone if the whole thing! So instead I chose to use this tranquil fishing decoupage from the CD "The Best of la Pashe 2014" teamed with checked paper and vellum from my snippets box.

The purple check is a vellum that was part of the pullout section of Making cards magazine, years and years ago, this time adhered to white card, and the greeting panel and printed "ribbon" were from the same issue. Goodness knows where the green/cream check paper came from, it's leftover from something but exactly what has been lost in the mists of time!


Monday 25 May 2015

Rudolph for Rudolph Day

It's the 25th of the month, and that means it's Rudolph Day at Scrappymo's, so here's my card, featuring Rudolph himself. Actually my five year old granddaughter would be very cross with me for calling Rudolph a "he", last Christmas she pointed out to me that only female reindeer keep their antlers through the winter, and therefore Rudolph must be a SHE. So, I'll rephrase that..... here's my card featuring Rudolph Herself!


The banner came from an old Craftwork Cards goody bag, and I rummaged through my snippets box  to find snippets to go with it. I die cut the square using a Nestabilities set that I really don't use often enough! Rudolph is coloured in with Promarkers and the snow highlighted with Wink of Stella.


As well as Rudolph Day, I'm popping into the Snippets Playground at Pixie's Crafty Workshop  and also joining in with Crafty Hazelnut's Christmas Challenge - use a die cut or something punched  and Christmas Card Challenges - Anything Goes as well as making another visit to Addicted to CAS - Animal with a very different card to the one I shared yesterday!

Fougasse with almonds and fennel

Yesterday's Grand Prix was the Monaco one - usually my favourite race of the year. I didn't see it, as we were out at the Fleet Food Festival (there'll be a full report of this super day out on Mark's blog later this week) but last night's sports news was full of reports of team failures and temper tantrums so I'm sure I'd have been disappointed if I'd seen it.

Anyway, it means that F1 Foods at Caroline Makes is looking for recipes for Monegasque dishes. I did a bit of research on the topic, as I thought everybody in the Principality lived on champagne and caviar, but apparently they do have a few traditional dishes, one of which is a variation of Fougasse with almonds, aniseed and sometimes orange in it. I couldn't find a recipe, so I devised my own, using fennel seeds because I had no aniseed,   and omitting the orange because I wanted to use the finished bread for dunking in some of the rather gorgeous lemon and thyme infused rapeseed oil that we'd bought at the food festival.


Incidentally one of the references I read suggested that the slits in the fougasse are supposed to represent an olive branch. If you squint hard enough, maybe you'll be able to see the resemblance!

Fougasse with almonds and fennel (makes one loaf)

Make your dough by either hand or machine, using the following ingredients:

400g strong plain flour
80ml olive oil
225ml water
1 tbs coarse crystal salt (yes, it's a lot of salt - but you don't eat this bread every day!)
1 tbs fennel seeds
1½ tsp dried yeast
(You will also need a further 2tbs olive oil and a large handful of flaked almonds, about 50g,  to finish the loaf)

When the dough has had its first rising, turn it onto a baking sheet lined with non-stick paper (it's too hard to move it once you've shaped it!) and press into an oval shape about 15cm x 25cm, then cut slits in the centre and diagonally either side. Using your floured hands, gently pull and stretch the dough to enlarge the holes and give the traditional Fougasse shape. My bread rose a lot and the holes closed up quite a bit during cooking - try to get them as big as possible to allow for this. It helps if you start at one end of the loaf and work towards the far end, always pulling the dough towards the un-stretched end.

Now brush the entire surface of the dough gently with olive oil and sprinkle with the flaked almonds, pressing them gently to try to encourage them to stick to the surface.

Cover the loaf with oiled clingfilm and set aside until puffy and risen, about 40 minutes. Heat the oven to 190C/170C fan/375F/gas mark 5.

Remove the clingfilm and bake the loaf for around 30 minutes until golden. If you want to use the traditional "tapping the bottom to see if it sounds hollow" test for doneness, lift it carefully rather than turning it over, as some of the almonds WILL fall off, however careful you've been.


The bread was absolutely delicious - in fact as well as dipping in the oil, we both grabbed an extra chunk to mop up the last of the sauce on our pasta main courses. The fragrant fennel seed and toasty almonds were a gorgeous combination.  Definitely one I'll make again!

Print Friendly and PDF

As well as F1 Foods

I am also sharing this with Bready, Steady, Go - bread with bits in it at Utterly Scrummy Food For Friends and Jen's Food.

Sunday 24 May 2015

A bit of extreme CAS

Several years ago, I bought a Hot Off The Press Christmas kit that included lots of large metal embellishments that were designed to be held in place with brads. I've used most of them, but still had this silver coloured  "Joy" one left. Somehow none of the brads left in the kit looked right, consisting as they do mostly of brown squares, and the hole in it was too small for most of my other brads.

Until, that is, today when I realised that my Cropadile can punch through thin metal, so I could use it to enlarge the hole. That meant I could brighten up the word by adding a star shaped brad as the centre of the O. I placed it on a black die cut circle to show off the metal, and all it really needed then was layering onto gold and silver circles to complete the card. Very extreme CAS, I know, and yet anything else would have been Too Much.

By the way, as always, the gold and silver card look rubbish in the photos! I really have NOT mastered the art of photographing metallic card. In fact now I've uploaded it to the blog, the silver word looks gold too....... think I might try a second photo.....


Ho-hum, now you can see the metallic card - but the black looks grey!

I'm sharing this with
Less is More - Metal
Shopping Our Stash - Silver and Gold

Are you being ignored?

If you own, or have ever owned, a cat, you'll know what it's like when they have decided to ignore you. They don't just take no notice of you, they ignore you with every muscle in their body! This cat silhouette stamp, which I think was a covermount on Craft Stamper a few years ago, always makes me think of a cat, rigid with "I'm ignoring you"-ness, sitting with its back firmly pointing in your direction.

Somewhere, years ago, I heard the quotation "You have never been truly ignored until you have been ignored by a cat." I've tried searching for it and although I couldn't find the exact quote, I found dozens that expressed the same idea. Being ignored by a cat is obviously a very common occurrence! I really wanted to use the saying along with my silhouette stamp, so I computer generated it and printed it onto my card. The font I used is Kristen ITC in size 18 point, and I found that by using Print Layout in Word at 87% size, the page on the monitor came out exactly the size of my card, so I was able to hold a thin sheet of  copier paper up to the screen and view my text through it, in order to position it perfectly before printing.

Then all I needed to do was cut the card to size and stamp my cat, using Promarkers to add a little shadow for interest, because obviously as well as ignoring me, the cat would have chosen the sunniest spot in the house and therefore be casting a shadow.


I'm playing along with Addicted to CAS - Animal

Saturday 23 May 2015

Last night's dinner

I hadn't intended to blog about the meal I cooked last night, but Mark took such lovely photos of it that I couldn't resist sharing them! I'd planned to make an old favourite, Lamb and Mixed Fruit Pilaff from an ancient copy of Supercookery,  and serve it with a plain green salad, but having been flicking through my copy of Persiana by Sabrina Ghayour, I spotted a couple of other dishes I fancied making.

So here we have Lamb and Mixed Fruit Pilaff,  grilled asparagus marinated in harissa and lemon juice, and roast butternut squash with a parsley and pistachio pesto (the recipe has coriander and dill in the pesto too, but Mark is allergic to coriander, neither of us likes dill, and the parsley is threatening to take over the garden) with pomegranate seeds and crumbled feta cheese. The finished plateful has even more colour added with a few of Mark's home-dried tomato slices.


Love birds

The inspiration for this card came from the current photo inspiration at Addicted to Stamps and More


It reminded me of a set of Polkadoodles stamps I have - I've always used the pretty spring pastels that go with the papers on the accompanying CD when using the stamps, but by using it separately from the CD and taking this colour scheme as a guide, it's taken on a completely different look.

I've used just two shades of purple Promarkers for the colouring, plus a white gel pen for the flower petals. Leaving everything else uncoloured has given it a dramatic monochrome effect.

I stamped two birds, heading towards their love nest, to make is suitable for a wedding card to fit the Purple and Love/Wedding theme at Inkspirational.


Having left the CD firmly out of things, there is no patterned paper on this card, it's all stamping, so it fits in with the current No Patterned Paper challenge at Fan-Tastic Tuesday.

I'm popping back to Make my Monday for a second flutter into the Things with Wings challenge

And last but not least, I'm also joining in with Birds and/or Bees at Sweet Stampin' Challenge blog (and I hope to be back with a bee themed card later in the week, time permitting).

A "pear" of tags

Here's the latest inspiration photo for the Tag You're It challenge


I've interpreted it using my lovely little set of Studio G pear stamps, adding a touch of gingham ribbon and some die cut heart shaped buttons, cut using a Tattered Lace die in my Grand Calibur (It's a bit of a faff using such a tiny die in the GC - I'm beginning to see the attraction of the new dinky little Sapphire machine!).

For the underneath tag, I had a scrap of green card that was embossed with a leaf design. I overstamped it with the smallest pear stamp from the set, using Versamark ink, and scored a bolder embossed line around the edges.


I'm also sharing this with Cuttlebug Mania where the challenge is Ribbon. For some reason every time I've tried to think about this challenge so far, my mind has gone to the same idea, which I tried and didn't work, and I've not been able to get beyond it, like an old fashioned record player with its needle stuck in the groove, but making this tag has given the rickety old record player a knock in the right direction!
And also a last-minute entry to That Craft Place, as the current challenge is Tags.

Friday 22 May 2015

Beef and Mushroom stir fry

This is a dish that was born out of necessity. The other day, I was sent a voucher, as part of Tesco's The Orchard scheme, to try some of their hand cut beef steaks at a great discount, so I bought two of their budget sirloin steaks, normally priced at just £3 each and planned to serve them with chips that evening.

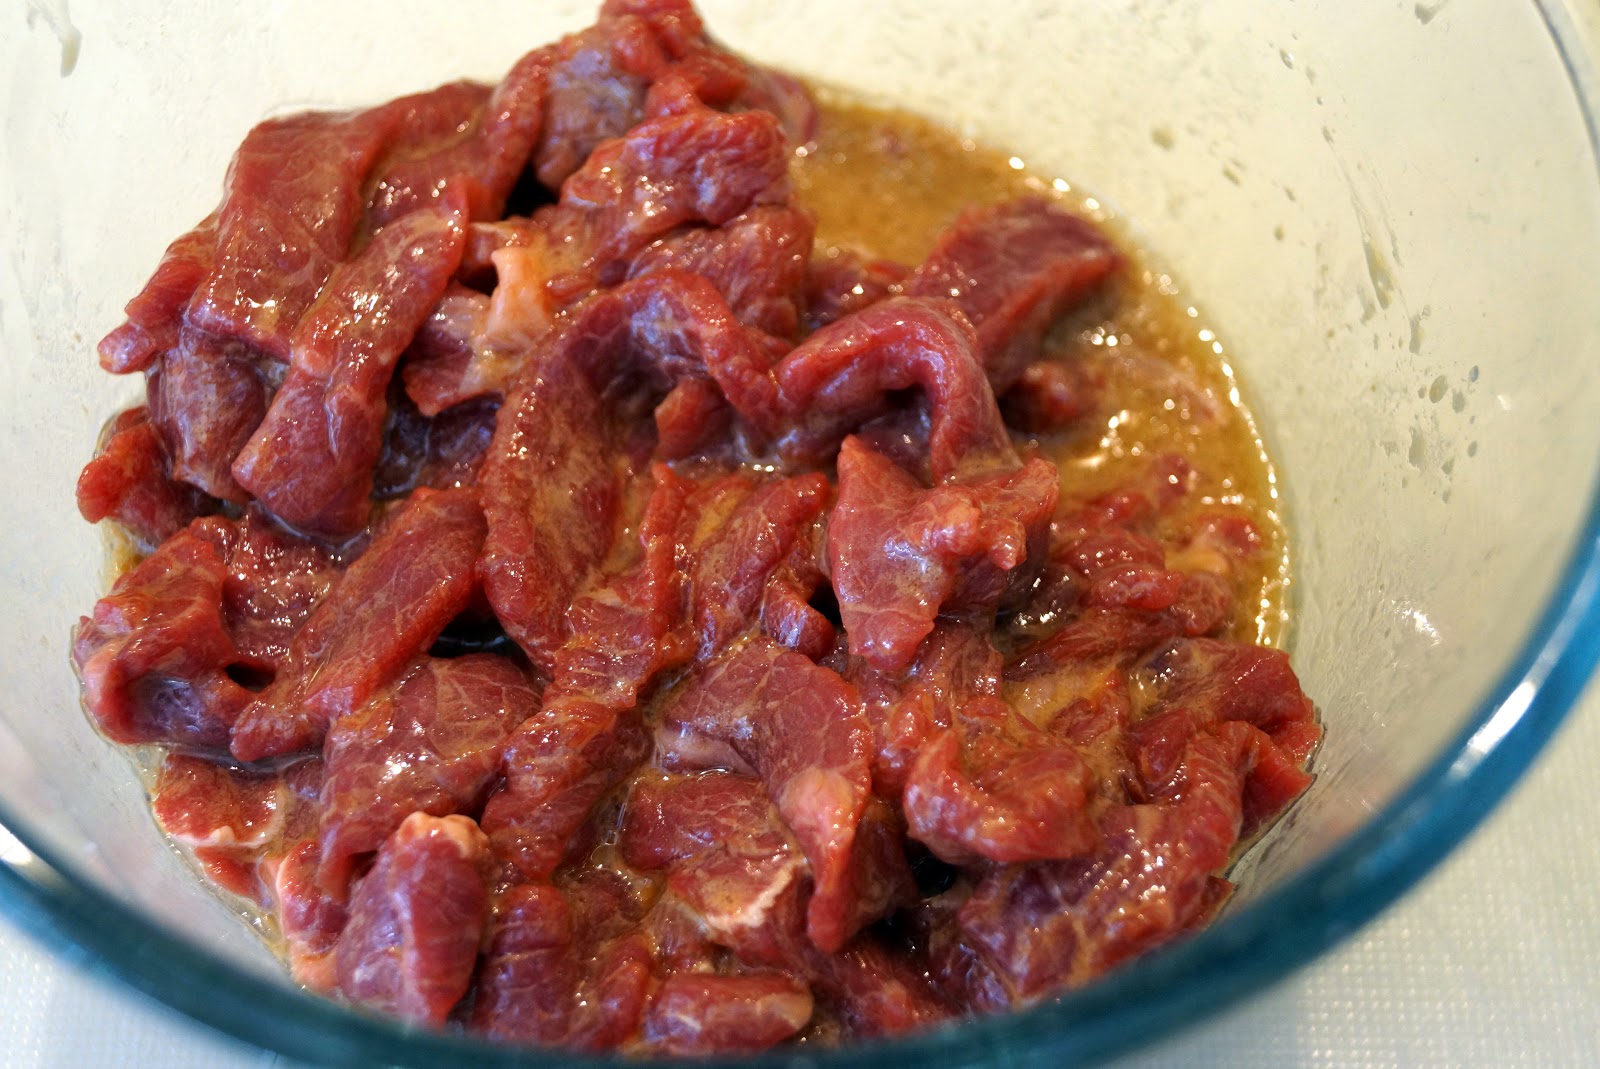
However Mark arrived home with toothache and didn't fancy biting into a steak, so I had to do some quick thinking and revise the menu. I trimmed the fat off the steaks and sliced them very thinly then made up a quick marinade for them to sit in while I prepared the onions and mushrooms that would have been served with our steak and chips. I put them all together into a quick stir fry, and served it with noodles.

The steak was tender and delicious; I wouldn't usually think of using sirloin in a stir fry but the finished dish would have made four takeaway-sized portions, so two £3 steaks is a reasonable outlay for such a quick, tasty dish.

I must say I was remarkably impressed with the quality of the meat. When choosing steak, I usually go for the top-of-the-range products thinking I will get better quality, but having tried these I can see I was mistaken! You can see from the photos that it is lightly marbled, which promises tenderness and flavour, yet with no gristly bits.


Here's the recipe - to serve 2-4 depending on what other dishes you are serving.

2 sirloin steaks

marinade:
1 tbs soy sauce (I used light, but you can use light or dark)
1 tbs groundnut or sunflower oil
1 tbs Chinese cooking wine (you can substitute dry sherry or Crabbies Green Ginger wine)
1 heaped teaspoon cornflour

Whisk marinade ingredients together. Slice the steak into very thin strips about 1cm wide and 7cm long. Put them in the marinade and mix well (use your hands!) so the meat is evenly coated. Leave to stand for at least 5 minutes - half an hour is ideal.


to finish:
150g mushrooms - any type. I used portabellini because that's what was in the fridge
1 medium onion, peeled and thinly sliced vertically
1 piece of fresh ginger about the size of the top 2 joints of your index finger, peeled and cut into matchsticks
1 clove garlic, crushed
1 tbs groundnut or sunflower oil
1 tbs Chinese cooking wine (or alternative)
2 tbs soy sauce
250ml beef stock
2 tsp cornflour, blended in a little cold water

Heat the oil in a wok or large frying pan. Add the onions and ginger, stir fry for 1 minute then add the meat, drained of any surplus marinade, and stir fry until  all pieces are browned. Stir in the mushrooms and garlic and continue to fry for another minute.

Splash in the wine, allow to sizzle for a few seconds then stir in the stock and soy sauce and bring to the boil. Simmer for a minute and then stir in the blended cornflour, stir until thickened and serve.


This makes no claim to authenticity but is quick, easy and tasty. I presented it in a Chinese serving bowl,  and we ate it with noodles, but it could equally well have ben served with rice, pasta or potatoes.


Print Friendly and PDF

Thursday 21 May 2015

Butterfly with a Doily

The latest challenge over at Butterfly Challenge is Butterfly and D for Doily and I thought it would be a good chance to  use a die I'd not used before, to cut my own doily. I've had the die for about a year, and thought I'd get endless use out of it, being able to cut them from exactly the papers I wanted to instead of always using the colours chosen for me by the manufacturers, but every time I use a doily, I seem to have a ready made one the right colour.

In fact after rummaging through my snippets box and finding this pretty butterfly paper, left over from an old Making Cards mag freebie, I did have a ready made one almost the right colour, but I also happened to have a scrap of pearlescent paper that was an even better match, so my die got to come out to play at last.

Other snippets provided material for the border and the die cut butterflies and words. I very carefully positioned the word "Someone" to be exactly central and stuck it in place - then remembered that "Special" is a lot shorter word than "To" so was left with a gap on the left. Hence the sparkly heart! (and that was after I'd stuck the front panel on the card upside down and had to rescue it..... do you ever get days when you really ought to lock yourself out of the craft room?)


Thanks to all these snippets, I'm also going to head over to Pixie's Crafty Workshop and play along with the Snippets Playground.

Dragonflies and Waterfalls

I absolutely love the Design House Meadow's edge and Water's Edge CDs, and this card is made with papers printed out from Water's Edge. I'm a big fan of dragonflies (I *may* just have mentioned that a few million times already?) and decided to incorporate both the large and the small dragonfly waterfall mechanisms into a single card, so made a trifold card with one on each of the outer two panels.

Waterfall cards seem to have dropped out of fashion and I think it's time they were due for a revival  because they look far more complicated to make than they really are


I'm sharing this with Make My Monday where the current challenge is Things With Wings.

Tuesday 19 May 2015

World Wildlife at Cardz 4 Guyz

It's Tuesday and that means time for a new challenge at Cardz 4 Guyz. This week our theme is World Wildlife and I've dug out one of my favourite old unmounted stamps, this lovely and dramatic tiger's head. I don't know who it was originally made by as it was sent to me in a RAK many years ago. I've stamped and embossed it in black then coloured it in with Promarkers.

The background is green paper with a very slight, tiny pattern which I have overprinted at random with a leaf stamp in a slightly darker shade of green. I used a Dymo Tape machine to print the word "Tiger" which as well as reflecting the image, I know is a term of endearment lots of women use for their menfolk.


Monday 18 May 2015

"Moroccan" spiced chicken crown with lots of lovely veg

I've called this "Moroccan" in inverted commas because it doesn't actually bear any resemblance to any Moroccan dish I've ever tried, and yet the overall effect is very reminiscent of many Moroccan  and other North African dishes I've eaten.

It's sometimes possible to buy a chicken crown, which makes a very convenient meal for two, but this could be made with any chicken portions. The real advantage of a crown is how easy it is to loosen the skin, spread the harissa paste onto the surface of the meat, and then replace the skin - and although chicken breast can easily get dry when cooked, the spice paste helps to prevent that. I'm loving North African and Middle Eastern spices at the moment. I always have a heavy crush on them after visiting my daughter who lives in France, close to the Swiss border, because one of the highlights of our visits is usually a trip to a shop overlooking the border post near Geneva that stocks the most wonderful range of spices, pulses, oils and other goodies. I think the shop itself is Lebanese, but it sells products from right around the southern and eastern shores of the Mediterranean. This recipe makes good use of the harissa and ras-el-hanout I bought on a recent visit.

Ingredients (to serve 2)

1 chicken crown
¼ small butternut squash, peeled and de-seeded
2 carrots, peeled
2 small onions, peeled
1 medium tin chopped tomatoes
1 small tin chickpeas
1 tbs light olive oil
2 tsp harissa paste
1 tsp ras-el-hanout
1 lemon, juice and grated rind
lots of chopped fresh parsley

Pre-heat the oven to 180C (fan) /200C (normal)/ 400F/ gas mark 6.
Cut the onions into wedges and the carrots and squash into roughly 3cm chunks. Place in a large roasting tin and toss with the oil and lemon rind, making sure everything is coated evenly.

Loosen the skin on the chicken crown from the neck end, not going quite to the edges and being careful not to tear it, then push the harissa in between the skin and flesh, smoothing the flesh from the outside to spread the paste evenly. Then nestle the chicken in among the veg, drizzle over the lemon juice and sprinkle the skin with the ras-el-hanout.


Roast in the pre-heated oven for 40 minutes, stirring the veg occasionally  - some charred, blackened buts are good but you don't want anything burned to a crisp! Then tip in the drained chickpeas and tinned tomatoes, give everything a stir and return to the oven for 10 minutes.


Remove from the oven and sprinkle the veg generously with chopped parsley.


Cut through the middle of the chicken bone and serve with couscous.


Print Friendly and PDF

Despite being neither vegetarian nor a dessert (sorry!) I'm sharing this with the Extra Veg challenge at Veggie Desserts with Fuss Free Flavours and  Utterly Scrummy

Extra Veg - Hosted by Veggie Desserts May 2015

And also with The Spice Trail at Bangers And Mash

spice trail badge square